HomeAboutFreebies

Thursday, August 30, 2012

Writing: How it works in my room...

I have been trying to write this post for SEVERAL days now with out success, until now. It seems like I don't have a lot of free time at the moment, but I am MAKING myself stop and write this post. :)

I'll start back here at my Writers Bulletin Board.
I have the writing process displayed with posters explaining what to do at each step. Because of my surfing theme this year I am calling my kids Wave Writers. Kind of cheesy I know. I love that huge pencil with the reasons why writers write. :) Anyway...
I am using the ribbon with clothes pins to display where my students are in the writing process. They will move these clips and I will use them to help me conference with my students during Writing.
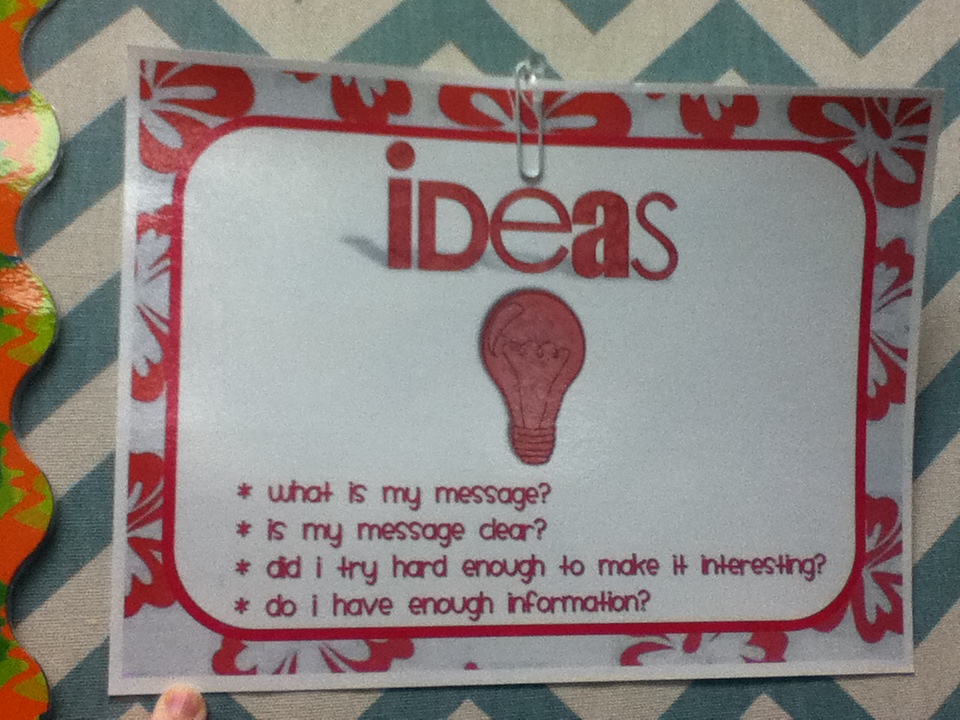
Next, we move on to the 6 traits. Oh boy these are not easy for my ELL kids. They are not as concrete as the writing process and we get a bit lost some times. I am hoping this will help us keep it together this year.
  I did not staple these down. Rather I attached them with a paper clip hung on a push pin. When I teach Ideas, next week I can move it and place it next to the "We are learning about..." sheet.
I also plan to add mini versions of my districts anchor charts, but I don't have them yet. :/ I will update when I do get and laminate them.

On to my writers storage and supplies.
This is what the front of my room looks like. Right under my white board I have this sweet little set up, that took me forever to think through. I had the custodian take the bottom legs off of 2 desks to make it just the right size. :) And I have extra storage in the desks. I am thinking of either turning them around or adding some fabric/ table skirt to cover it up. For now it isn't bugging me too much.
The purple crate houses our writing paper. I wish I had a close up shot of it. The red hanging folders house the Kinder writing paper, the blue is for 1st grade and the green is for 2nd and 3rd grade. My students never have to ask permission to get paper during writing time and this works great. Then I can conference in peace. I have some updated versions of my writing paper for each grade level so look for that coming soon.

The crates house my 1st, 2nd and 3rd graders binders. Can't tell you how happy I am to be back to binders. We had a donation last year of gently used binders from an office building and I snapped them up. However, if your looking for a multiple pocket folder go here and here for a quick fix.
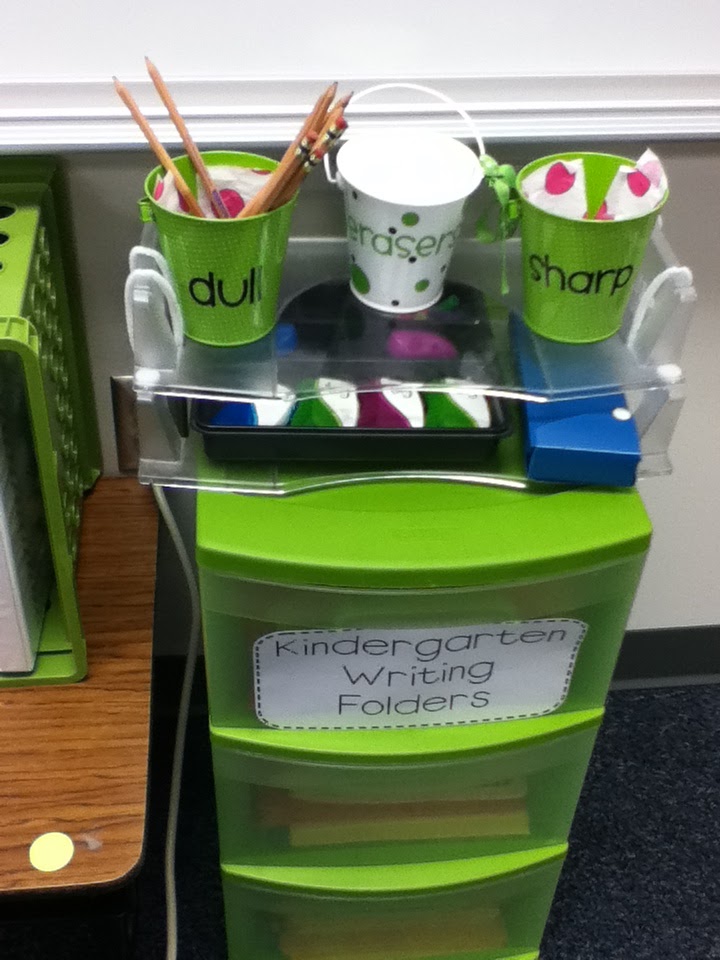
My kinder kids still use 2 pocket folders and they are housed in one of the drawers of my 3 drawer cart. On top of that cart, I have my extra writing supplies. Everything from pencils, to erasers, sharpeners, staplers, even some Popsicle sticks to make our spaghetti and meatball spaces. MY students are allowed to go here at any time to replenish their supplies. No need to ask.
Can you see that I added some fun tissue paper to the bottom of my pencil buckets? I hate when they get marked up from the pencil lead. I am so OCD, I think I have a problem. :P

Finally, a shot of my Word Wall. Obviously it is not up on the wall yet. Still waiting on the district people to come in and drill it to the wall.
 I went with the 2 tone paper again. I like how it separates each letter and that is so important for my kids. Especially when I start adding words for 4 different grade levels. Yikes.

So a freebie for you...
Below you will find links to writing folder cover sheets.
We use these in the front of our binders so that I can easily distinguish, by color what grade it is. 
Kinder Writing Cover
 1st Grade Writing Cover
2nd Grade Writing Cover
3rd Grade Writing Cover
4th Grade Writing Cover
5th Grade Writing Cover
General Writing Cover
For my kinder kids who use a 2 pocket folder, I will glue their sheet to the front of their writing portfolio. I will collect all their writing at the end of every quarter and store it in there.

In addition to all that Writing stuff I just threw at you I want to introduce you to two relatively new, new to me, teacher blogs. These are 2 male teachers. I know just plain weird right? LOL, j/k
Now Gary from, Follow Your Bliss and Liam from, A Twist of Liam have some company.
Mr. Smedley's Kinder Blog
Mr. Michelbook's 1st Grade Blog
(Here is a secret, Mr. Michelbook is having a giveaway.)

I think that is all for now.
Have a great rest of the week!

Sunday, August 26, 2012

Instructional Bulletin Boards

Hi everyone,

I am taking a break from Operation Classroom to show off another bit of my room.

I have to say that what I am posting about today is one of my favorite parts of the classroom, of MY classroom, bulletin boards. There has been a lot of talk about bulletin boards and how to decorate them this year. It seems like there is a lot of pressure to make them look great. I personally like things to look clean and pretty and modern. I don't always achieve it but I try.

This year I was so consumed with moving in to my renovated school, my new room, and unpacking that I gave little thought to my bulletin boards. I knew I was going to use a theme, surfing, but not much thought went into how or what I was going to put on my BBs. Part of that was cause I didn't know where I could put stuff up, not having seen my room yet. The other bit was because I have been teaching a bit now I kind of know what I want up on my walls. Ie: I know I will have my alphabet over my white board, I know I will designate one BB for writing, etc...

So when I got into my room and I had less than a week to unpack and have the room up and ready to go I kind of freaked and went into just get it unpacked and hide the mess mode. My BBs were last unfortunately. I can tell you I would go home and think about them all night and still could not figure out what I wanted.

To make a VERY LONG story short, I finally found some fabric at Hobby Lobby and settled on one look across the room. I was actually very lucky, I was going for a gray chevron but lucked up on this beachy blue and kind of light tan chevron. It goes so much better with the theme.
I have added to it since you last saw it. I put up the palm tree just 2 days ago. At first I was afraid that the chevron was too busy. However, I love how it kind of looks like waves. This is obviously my calendar/ carpet space bulletin board.

 This next bit just kind of evolved into what it is now and I just ADORE it! It is my Reading bulletin board. This year I am trying to make my life easier and going to teach the same reading strategy to all my kids across all 4 grade levels, k, 1, 2 and 3. Last year it was crazy jumping around trying to match the Gen ed strategies. I am figuring if I teach them all by the end of the year then I am good.
 So I framed the outside of the BB with the different reading genres posters. Christy from Teaching in FlipFlops made these for me last year. If you have not seen her room you have to. I am SUPER jealous how her room turned out.

As you can see I used the waves of blue boarder but did not have enough to cover all my BBs. I wanted them all to match so I used waves of blue below and the rainbow waves above. Kind of like a sunset thing. Don't know if I love it but it is staying up for now.
 On the actual BB I am going to post the strategy and a definition. I will have up some visual representations or anchor charts AND some super big/ blown up graphic organizers for this strategy. For me this is HUGE cause it will help my ELL kids make those connections.
 Some of the elements on this board were made by me but the icons and one of the graphic organizers came from Lindsey's, The Teacher Wife, Comprehension 2 packet. I just love it. As you can see I started with "Making Connections". I will leave these up for the duration of the time I will teach this strategy then change it all up for "Story Elements". However, I will keep the same format for my kids. Consistency is the key for my kids.

 My 3rd board is my Writing strategies board. This has actually changed quite a bit and I want to talk about it in depth more with some other Writing components I have in my room, at a later time, so I will be brief.
 I put up the Writing process posters to the left of the board. Again Christy from Teaching in FlipFlops made for me last year. They are Hawaiian print to go with the surfing theme. So it kind of mirrors the BB on the other side of the white board.
 Here is a close up. My students will eventually move these clothes pins to show where in the writing process they are.
I put up the 6 traits on the board with a thumb tack and paper clip. This way I can move around the posters and don't put a million holes in my beautiful fabric.
I am working on making small versions of my districts writing traits posters and posting them under these traits. I mean it would be chaos to have 6 posters up for 4 different grade levels.

The last bit I want to show off today is my new alphabet line! Just my absolute favorite new thing. Makes me happy whenever I see it. It is clean, pretty and modern. Obviously it came from Kristen from Ladybug Teacher Files. She has SEVERAL different versions in her shop so don't hesitate to check her out.

So that is all for now. In a day or two I'll post more about how Writing works in my room this year. I've given it a bit of an overhaul/ facelift and am super excited to share with you all.

Now I am off to do some lesson planning.
Have a great week!

Wednesday, August 22, 2012

Operation Classroom: Whole Group, Student Tables

Class us up and running, even if it is not completely perfect. This is a big thing for me. I am not a perfectionist but I like to try to be. :P However, this year my motto is "It will get done eventually."

Here is my next installment of Operation Classroom...
 
This is a view from the door.
Some of this has actually changed a tiny bit but the layout of the tables and chairs has not.

This is a view from the opposite side.

As you can see I have two tables that seat 4 (possibly 6) on the left side of my teacher table.
Each table has two supply, pencil and crayon baskets.
Two students (possible 3) share those supplies. For now i have them on the edges of the tables, but should I have to add that 3rd student the baskets/ caddies will move to the center of the tables.
Here is another view from the front of the room.

AND here is my teacher table. The chair was inherited from a fellow teacher who is now retired and living it up on the golf course. The table is kind of messy at the moment but you can see I have got two trays, one for my random papers and the one to the left will hold my daily student work by grade level. You could subjects instead of grade levels. Here is where I also have my beloved projector and Doc Cam. Don't know how I taught without them. There is also a plastic box that houses all of my teaching items so that I don't have to share the bogie covered crayons with the kids. It also allows me to model what it is like to keep my materials clean, neat and orderly.

My third table makes an L with my teacher table. This table is for those students who I want to keep near for whatever reason, ie: behavior or extra support, etc.

I have so many little things I want to share about this space, ie: my bulletin boards, but they really deserve their own post so I will save them for another time. Now it is your turn. What does your whole group table/ desk space look like?


Thursday, August 16, 2012

Operation Classroom: Day 3 Whole Group (Carpet)

Wow, this post has been a long time coming. Been thinking it through for a while and just now finally got a moment to post it. 

For those of you that don't know, my students started back at school on Tuesday. We have had a shortened day, one hour less, and I still find myself tired at the end of the day. So far my kids are cuties. 

Most of my 1st, 2nd and 3rd grade kids I know from previous years. Obviously my kinder kids are new but I do know some from older siblings. My Kinder kids are the naughtiest by far but even then it is because they are completely clueless as to what to do. I always forget how much work the start of the year it is. I never remember how often I have to say "No" and "Sit down." :P 
But that is not why your here. Take a peek at my Whole Group Teaching Carpet space.
A view from the back.
Obviously I will do calendar and the weather here, along with anything else I want on the carpet. I have my easel packed with supplies and manipulatives I may need during instruction.

After days and days of frustration and not finding the color paper I wanted for my calendar background I went to Hobby Lobby and found this FABULOUS chevron fabric. Keep in mind that they must have just gotten it in cause I had been there SEVERAL times before looking for the gray version. They had the gray version but decided the blue would go better with my Surf theme. I also got a green version but I'll tell more about that later. I could go on and on but I'll let you just look and absorb it all.

Here is a view from the front of the space.
I used the book shelf to separate the space this year. I like how it breaks up a LARGE room into sections. Plus I get to use the back of the shelf  for my pocket chart which I use in both whole group instruction and as a pocket chart center so win, win. Also there are my wonderful small carpet squares I got from a Donors Choose grant last year.

I currently have a NEW grant up, if you would like to take a peek at what I am coveting this year, click on the button below. :)
Photobucket

Wanna Link up your carpet area?


Coming soon is my Day4: Whole Group Teaching (Tables/ Desks)

Tuesday, August 14, 2012

Back to School Jitters, a linky party.

I think this linky party couldn't come at a better time. My first kid day is today. Yikes, my room is not ready, by my standards. I have so many little things I want to make before the kids walk through my door. Thank goodness I won't pull kids on day one, but I will on day two so I better get my act together by the end of the day tomorrow. I have so much to share with you, and so many pictures, but not enough time. So when I saw this linky party on Greg's Smedley's Smorgasboard of Kindergarten I thought I would just link up my back to school jitters.
Want to share your jitters? Just click on the button below and link up Ms. Jessica, from A Turn to Learn.

Back to School Jitters Linky Party

Keep your eyes open for my next installment of Operation Classroom and wish me luck today.

Wednesday, August 8, 2012

Opertation Classroom: Day 2

Hi everyone, I am back... 3 days late. Hey, better late than never right?

Today I want to show you all what I have set up for my Guided Reading. At the moment my GR table looks like a war zone BUT I do have pictures of the clean desk top 3 days ago.

See that table with the two caddies, adjacent to my teacher table/ desk? Well that is where I am doing guided reading this year. I tried it out last year and I really liked having my guided reading groups close to all my materials so that I could take notes, and grab forms, or fill out data on my laptop with out having to haul all of my materials to another section of the room.
I use the stools because I can tuck them under the table to save space and create a clear traffic path in my room.
 Another view.

Because I am teaching 4 grade levels this year I wanted a way to separate my materials. Last year I had a very hard time with this and knew I had to create something new. I had plans to use the caddies that were sitting there but I realized I didn't have enough to cover all my tables and each grade for GR. So I re-purposed some other tubs I had in my room. Here is what I came up with.
I labeled each tub, added a box for note cards which will house vocab words, a cup with a colored ribbon and Popsicle sticks AND books! Then I did one for each grade.

I did have an extra tub and decided that would be MY tub with materials that would be used with all the groups, ie: clipboards, white boards, extra pointing sticks.
Now I have to find a way to make it prettier.

Here is where they will be housed.
And a close up of the tub label...

Here is your chance to link up and share your Guided Reading Space.


Don't forget that you still have 2 days left to enter my Lucy Lew's Vinyl decal giveaway.
Now to figure out what else I can do with these cute ribbons. :)